


FlashForge Creator Pro Quick Start Instructions
Set-Up and Leveling Platform
- Place 3D printer on level surface (and away from student desks unless supervised at all times).
- Plug 3D printer in and turn on power switch.
- Take a regular piece of printer paper and place it on the platform.
- On the control panel, select ‘Utilities’, then ‘Level Build Plate’. The platform and nozzles will align.
- Once they have stopped moving, pull the piece of paper out from beneath the nozzles. If it comes out easily with no drag, turn one of the three leveling screws on the bottom of the platform until their is just a slight pull on the paper. (You don’t want a lot of pull or the nozzles with scratch the kapton heat tape on the platform and your print may not work!)
- Gently push the nozzles to each corner of the platform and slide the paper under the nozzles doing the same kind of check- leveling with the screws to adjust as necessary.
- When finished, you’ll see that the control panel reads ‘Press “M” when level. It really means press “ok” when level. (The firmware was ‘borrowed’ from Makerbot and their ‘ok’ button is an ‘M’.)
Loading ABS Filament
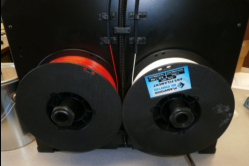 To load the filament, select the ABS filament colors you want and place them on the spools on the back as shown.
- Push the filament up through the feeder tubes until a portion of it is sticking out.
- On the control panel, select ‘Utilities’ and then ‘Filament Loading’.
- Then, select the unload or load function and which side nozzle you want to work with.
- The nozzle will begin heating and when it is ready you will hear the motor pushing or pulling the filament out of the extruder and nozzle depending on whether you are loading or unloading. If loading, gently push the filament in through the top of the extruder hole until you feel it grab. Then, watch for the new color filament to come out of the nozzle. Once it has passed through, you can press ‘ok’ and securely attach the feeder tube into the top of the extruder. Repeat this process for the other extruder and nozzle.The same applies if you are unloading filament to put in a new color.
Taking .stl files to .gcode to .xg3 to Print
 If you are creating an .stl file from scratch you should have downloaded a CAD program like tinkercad or inkscape, havea design drawn and saved as an .stl file. If you are pulling the file from thingiverse.com then you can
ownload the .stlfile directly to your computer.- Once you have an .stl file you are going to open it with the application ReplicatorG. (download ReplicatorG here.)
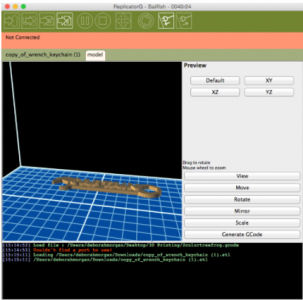 When you open the file in ReplicatorG, you will see the 3D image on the blue platform. Along the top menu, select the ‘arrow pointing to the g’ icon
  to convert the .stl file to a .gcode file.
- Once that is complete, select the ‘arrow pointing to the lined paper’ icon and this will convert the .gcode to a .x3g file so you can print to the printer.
- Save the .x3g file to the SD card and eject it from your computer.
- Insert the SD card into the printer.
- On the control panel, select ‘Print from SD Card’ and then toggle through the menu until you find the design you want to print.
- Press ‘ok’ and the printer will begin heating in order to print!
Troubleshooting Issues
| Problem | Troubleshoot |
| wispy sticky filament that isn’t sticking | Nozzle or extruder is probably clogged, contact CUES technology trainer for assistance |
| rafting is warping or won’t stick |
Platform may not be right temperature. Let printer rest for a few hours or overnight. |
| 2 Color object doesn’t line up when printed | .stl files were not merged correctly. Put them back in replicatorG and make sure they line up before you merge them. |
| How do I...? |
FlashForge Creator Pro Frequently Asked Questions |
If you have any questions or concerns, please email your technology trainer at CUES!